Embarking on a kitchen remodel is one of the most exciting and valuable investments you can make in your home. From bustling family breakfasts in Santa Cruz to hosting elegant gatherings in Monterey, the kitchen is the heart of daily life. According to Remodeling Magazine's 2024 Cost vs. Value Report, a minor kitchen remodel can recoup over 85% of its cost at resale, making it a wise financial decision.
However, a successful transformation from an outdated space to a functional, beautiful hub requires meticulous planning. Without a clear roadmap, it's easy to face budget overruns and timeline delays. This is where our ultimate kitchen remodel checklist comes in, guiding you through every critical phase.
At Aldridge Construction, we've managed countless kitchen projects across Monterey, Santa Cruz, and San Benito Counties, CA, as well as Maricopa County, AZ. We understand the unique local requirements, from California's Title 24 energy codes to Arizona's climate considerations. This guide distills our experience into actionable steps, ensuring you feel confident and prepared.
1. Set Budget and Timeline
Establishing a clear financial and scheduling framework is the most critical first step in any successful kitchen remodel checklist. Without a defined budget and timeline, your project can easily spiral out of control. This foundational stage requires a detailed breakdown of all potential expenses and a realistic schedule.
Why It’s Your First Step
A well-defined budget acts as your primary decision-making tool. It dictates the scope of your project, from the quality of materials like quartz countertops versus laminate to whether you can afford to move walls or reconfigure plumbing.
A realistic timeline manages expectations and helps coordinate the complex sequence of tradespeople. For instance, knowing that a full remodel in Monterey County can take 8-16 weeks helps you plan for temporary living arrangements and avoid frustrating bottlenecks.
Actionable Tips for Success
- Secure Financing First: Before you start picking out tile, have your financing in place, whether through savings, a home equity line of credit (HELOC), or a construction loan.
- Build a Contingency Fund: Always set aside an additional 15-20% of your total budget for unforeseen issues, like hidden water damage or outdated wiring discovered during demolition.
- Plan for a Temporary Kitchen: Factor in the cost and inconvenience of not having a functional kitchen for several weeks or months. This might include eating out more or setting up a small kitchenette elsewhere in your home.
The following infographic highlights essential data points to keep in mind during this crucial planning phase.
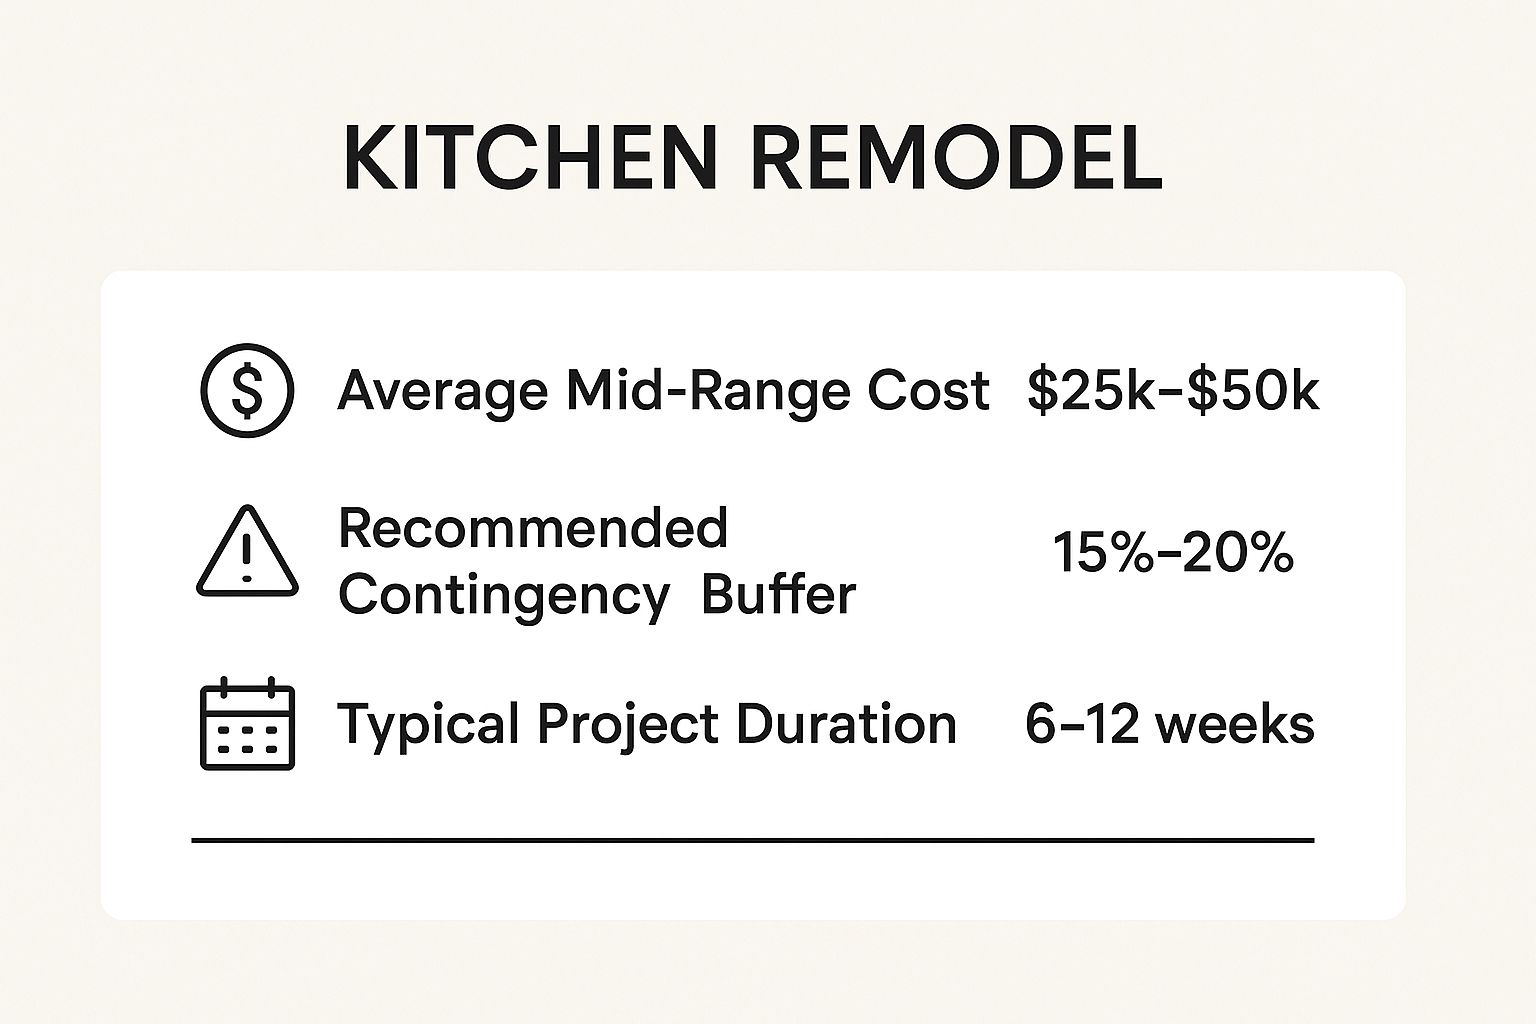
These figures provide a solid baseline, reinforcing the need for a healthy contingency fund and a patient mindset. Understanding the complexities of scheduling is vital, which is why we've detailed the entire process in our guide to a home construction timeline.
2. Design and Layout Planning
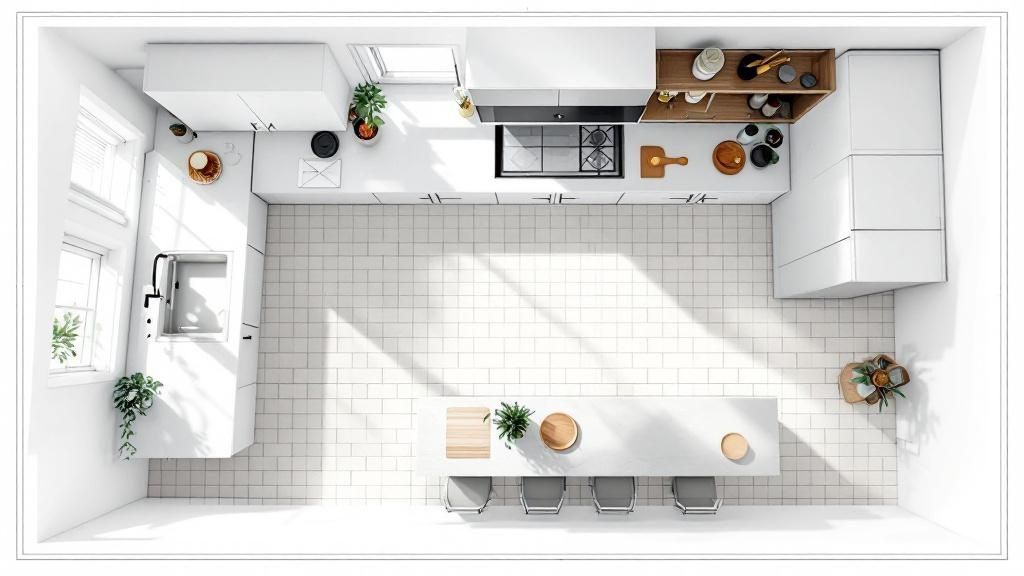
Creating a functional and aesthetically pleasing kitchen design is a pivotal part of any kitchen remodel checklist. This stage is about engineering a space that optimizes workflow, maximizes storage, and integrates with your lifestyle. A well-thought-out layout ensures every element, from appliances to cabinets, works in harmony.
Why It’s a Critical Step
Your kitchen’s layout directly impacts its efficiency. The classic "work triangle" connecting the sink, stove, and refrigerator is a time-tested principle that minimizes steps and streamlines cooking tasks.
Planning for proper traffic flow prevents congestion, especially in households with multiple cooks or frequent guests in Santa Cruz or Monterey. Whether you need an L-shaped layout with a large island or a galley kitchen to maximize a narrow footprint, thoughtful design is the blueprint for a kitchen that truly serves your needs.
Actionable Tips for Success
- Map Your Workflow: Consider your daily routines. Do you need a coffee station near the pantry? Ample counter space next to the range for prep? Design around how you actually use the space.
- Use Design Software (or a Pro): Tools like SketchUp can help you visualize the space. For complex projects, a professional designer can identify opportunities and prevent costly mistakes.
- Plan for Clearances: Ensure there is adequate space to open appliance doors, cabinets, and drawers fully without obstruction. A standard recommendation is at least 36-48 inches for major walkways.
A great design considers both form and function. To see how these principles are applied in local homes, explore the top features for a kitchen remodel in Salinas and gather inspiration.
3. Obtain Permits and Approvals
Securing the correct building permits is a non-negotiable step in any kitchen remodel checklist that involves more than cosmetic updates. This critical process ensures that any structural, electrical, or plumbing modifications meet strict building codes and safety standards. Skipping this step can lead to significant fines and major headaches when it comes time to sell your home.
Why This Step Is Crucial
Engaging with your local building department in Monterey or Santa Cruz County early is essential. Permits protect you, your family, and your property's future value.
For example, a permit is required for moving a sink (plumbing), adding new recessed lighting (electrical), or removing a wall (structural). Failing to obtain one means the work is undocumented and may not pass a home inspection, potentially jeopardizing a future sale.
Actionable Tips for Success
- Consult Local Requirements Early: Check your city or county’s building department website at the start of your planning to understand permit requirements.
- Work with Licensed Contractors: A reputable, licensed contractor like Aldridge Construction will be familiar with local codes and the permitting process, handling the application and inspections on your behalf.
- Submit Applications in Advance: Permit approval times can take weeks or even months. Submit applications well before your planned start date to avoid costly delays.
- Keep All Documentation: Store your approved permits and final inspection sign-offs in a safe place as proof of code-compliant work.
Navigating local rules can be complex. For a deeper dive, explore our guide detailing construction permit requirements.
4. Hire Contractors and Professionals
Selecting qualified and reliable professionals is the engine that drives your kitchen remodel checklist forward. The execution depends entirely on the skill of your general contractor and tradespeople. This step involves carefully vetting credentials, comparing quotes, and establishing clear contracts.
Why This Is a Foundational Step
The right team prevents costly mistakes and ensures compliance with local building codes in areas like Monterey or Maricopa County. A licensed general contractor acts as your project manager, coordinating the complex dance between various specialists. Attempting to manage this yourself without experience can lead to scheduling chaos and subpar workmanship.
Actionable Tips for Success
- Get Multiple Bids: Always request detailed quotes from at least three different licensed contractors to compare costs, timelines, and proposed work scopes.
- Verify Credentials: Check for active licenses, proof of liability insurance, and workers' compensation coverage. Look up reviews on the Better Business Bureau.
- Establish a Clear Contract: A solid contract should detail the scope of work, materials (e.g., specific cabinet brands, countertop type), a payment schedule, and project timeline. Learn what to look for in a construction contract.
- Maintain Open Communication: Set up a regular communication schedule, whether through weekly check-ins or a shared project management app, to stay informed and address issues promptly.
5. Select and Order Materials
Choosing and ordering your cabinets, countertops, flooring, and fixtures is a pivotal moment in any kitchen remodel checklist. This stage requires careful coordination of style, budget, and delivery timelines, as material lead times often dictate the entire project schedule.

Why It’s a Critical Step
Material selection has the single greatest impact on your kitchen's final appearance and durability. It's also where some of the longest lead times occur. For instance, custom cabinets can require a 6-8 week lead time, while fabricating quartz countertops can take another two weeks.
Ordering these items too late can bring your entire project to a standstill. Proactive ordering prevents costly delays and ensures a smooth workflow.
Actionable Tips for Success
- Order by Lead Time: Prioritize ordering materials with the longest lead times first. This almost always means cabinets and appliances should be confirmed and purchased well before demolition begins.
- Request Physical Samples: Obtain physical samples of flooring, tile, and countertop materials to see how they look in your home's actual lighting.
- Consider Maintenance: Be realistic about your lifestyle. Porous natural stone like marble may need regular sealing, whereas engineered quartz is virtually maintenance-free.
- Have Backup Options: Supply chain issues are common. Always have a second or third choice for key materials, especially tile and flooring, in case your first pick becomes unavailable.
6. Plan Temporary Kitchen Setup
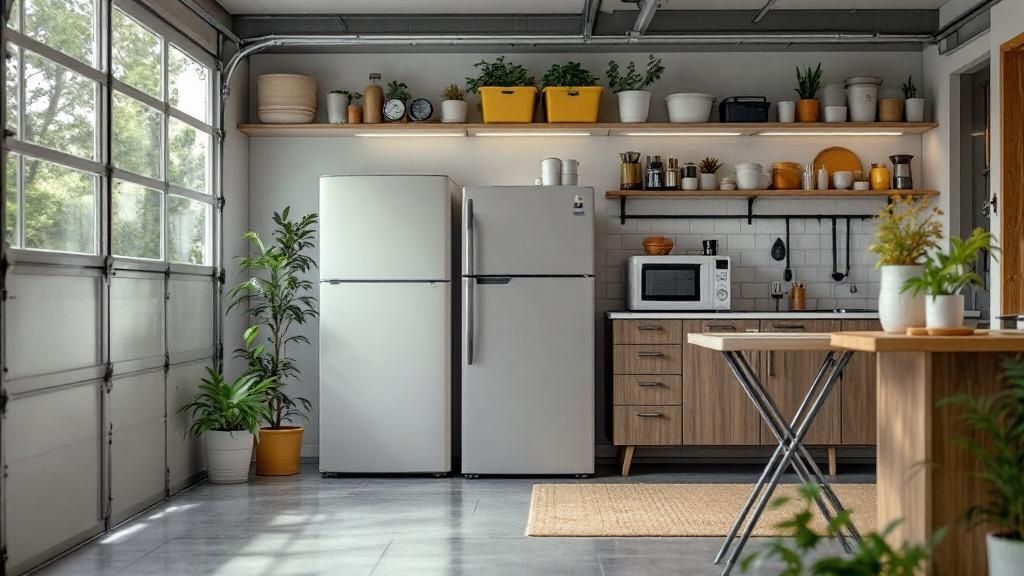
A kitchen remodel means your primary cooking space will be out of commission for weeks, if not months. Creating a functional temporary kitchen is an essential part of any kitchen remodel checklist. This step allows you to maintain some normalcy and avoid the high cost of eating out every day.
Why This Reduces Remodel Stress
Surviving a remodel is about managing disruption. A well-planned temporary kitchen significantly reduces daily stress for your family. By setting up a dedicated zone in a garage, basement, or dining room, you can still make coffee, heat leftovers, and store perishables safely.
Actionable Tips for Success
- Select Key Appliances: Move your refrigerator to the temporary zone or use a mini-fridge. Essential small appliances include a microwave, a coffee maker, an electric kettle, and a toaster oven or portable induction cooktop.
- Create Easy Cleanup Solutions: Your kitchen sink will be disconnected, so plan for washing dishes in a bathroom or laundry sink. Stock up on paper plates and disposable cutlery to make cleanup manageable.
- Rethink Your Meals: Plan a menu around your limited capabilities. Think simple meals like sandwiches, salads, and microwaveable options. A slow cooker or air fryer can be a versatile tool for one-pot meals.
7. Plan Electrical and Lighting
Designing a comprehensive electrical and lighting plan is a non-negotiable step in any modern kitchen remodel checklist. This critical phase involves creating a layered lighting scheme and ensuring your electrical system can safely handle today's appliances. Proper planning here transforms a functional space into a beautiful, safe, and highly efficient work environment.
Why It’s a Crucial Planning Step
A well-thought-out electrical and lighting strategy dramatically impacts your kitchen's usability and ambiance. It ensures you have bright task lighting for food preparation and warm ambient light for dining. For homeowners in Monterey or Maricopa County, this step is also about meeting stringent local codes like California's Title 24 energy standards.
Actionable Tips for Success
- Layer Your Lighting: Combine different light sources. Use recessed cans for general ambient light, under-cabinet LED strips for task lighting, and stylish pendant lights over an island for accent purposes.
- Plan for Ample Outlets: Strategically place outlets for all your small appliances. Ensure Ground Fault Circuit Interrupter (GFCI) outlets are installed within six feet of any water source, as required by code.
- Embrace Smart Technology: Consider installing dimmer switches to control mood and save energy. Plan for outlets with USB ports for charging devices or dedicated circuits for high-draw appliances.
8. Address Plumbing Requirements
Your kitchen's plumbing is a critical system that dictates the function and layout of your most-used fixtures. Addressing plumbing requirements early in your kitchen remodel checklist is essential for a smooth, code-compliant project. This step involves planning for modifications like relocating sinks or adding new water lines.
Why This Step Comes Early
Plumbing changes are foundational and often invasive, requiring walls and floors to be opened. Finalizing your plumbing plan before framing or drywall prevents costly rework. Deciding to move a sink to a new island after the subfloor is installed means cutting into finished work, adding expense and delays.
Actionable Tips for Success
- Map Fixtures Early: During the design phase, finalize the exact location of your primary sink, prep sink, dishwasher, and refrigerator ice maker line. This map guides your plumber’s rough-in work.
- Install Accessible Shut-Off Valves: Ask your plumber to install dedicated shut-off valves for each fixture. This simplifies future repairs without shutting off water to the entire house.
- Plan for Future Needs: Even if you aren't installing a pot filler now, consider running the necessary plumbing lines while the walls are open. This small upfront investment makes future upgrades significantly easier.
9. Handle Demolition and Preparation
With plans finalized and materials ordered, the project moves into the exciting and messy phase of demolition. This crucial stage involves the systematic removal of old cabinets, appliances, and flooring. It’s about carefully deconstructing the old space to create a clean, ready foundation for the new installation.
Why This Is the First Construction Step
Proper demolition sets the tone for the entire construction process. It prevents damage to surrounding areas and uncovers any underlying issues. This is when unforeseen problems, like hidden water damage or outdated wiring, are often discovered, and addressing them now is far more efficient.
Actionable Tips for Success
- Protect Adjacent Rooms: Seal off doorways with heavy-duty plastic sheeting and cover floors in high-traffic areas to contain dust. This is a non-negotiable step in any professional kitchen remodel checklist.
- Rent the Right Dumpster: Coordinate with your contractor to rent an appropriately sized dumpster for construction waste.
- Check for Hazardous Materials: Before demolition begins, test for hazardous materials like asbestos in older flooring or lead in paint, especially in homes built before 1980.
- Donate, Don't Just Dump: Consider donating usable cabinets or appliances to organizations like Habitat for Humanity ReStore.
Executing this phase correctly is fundamental to the project's flow. For a deeper understanding of how this step fits into the larger project, explore our guide on nailing the kitchen remodel sequence.
Ready to Start Your Kitchen Transformation?
Embarking on a kitchen remodel is a chance to redefine the heart of your home, enhance daily life, and boost your property’s value. This comprehensive kitchen remodel checklist has provided the detailed roadmap to move you from a broad vision to clear, manageable tasks. By systematically addressing each stage, you transform a potentially overwhelming process into a structured journey.
Key Insights for a Successful Remodel
- Planning is Paramount: The success of your entire project hinges on the initial phases. Rushing through budgeting, design, or contractor selection almost guarantees problems later.
- Professionals Are Your Greatest Asset: A qualified general contractor, like Aldridge Construction, acts as the central coordinator, ensuring every specialist’s work is integrated flawlessly and up to code in Monterey County or Maricopa County.
- Details Determine the Outcome: From the specific finish on your cabinet hardware to the precise placement of under-cabinet lighting, small decisions collectively create the final look and feel.
This checklist is a strategic tool designed to protect your investment, your time, and your peace of mind. By following it, you build a strong foundation for a truly transformed living experience. Your new kitchen will be a space where memories are made and your unique style is perfectly reflected.
Frequently Asked Questions (FAQs)
1. How long does a kitchen remodel typically take?
A minor cosmetic remodel might take 2-4 weeks, while a full gut renovation involving layout changes, plumbing, and electrical work can take 8-16 weeks or more. Timelines in areas like Santa Cruz County can be affected by permit approval speed and material lead times.
2. What is the most expensive part of a kitchen remodel?
Custom cabinetry is often the single largest expense, typically accounting for 30-35% of the total budget. This is followed by labor, appliances, and countertops made from materials like quartz or granite.
3. Do I need a permit for a kitchen remodel in California?
Yes, you will likely need a permit in California for any work that alters the home's structure, electrical, or plumbing systems. This includes moving walls, adding or relocating outlets and fixtures, or changing gas lines. Simple cosmetic updates like painting or replacing a faucet usually do not require a permit.
4. How much should I budget for a contingency fund?
It is industry standard to set aside 15-20% of your total kitchen remodel budget for a contingency fund. This covers unexpected costs like finding hidden rot, outdated wiring that needs to be brought up to code, or supply chain-related material price increases.
5. What is the "kitchen work triangle" and is it still relevant?
The kitchen work triangle is a classic design concept that places the three main work areas—the sink, refrigerator, and stove—in a triangular layout to promote efficiency. While still a valuable guideline, modern kitchen designs for larger spaces often evolve into "work zones," with dedicated areas for prepping, cooking, and cleaning that may not form a strict triangle.
Ready to turn your checklist into a beautifully completed kitchen? The team at Aldridge Construction specializes in guiding homeowners through every step of the renovation process, from initial design to final inspection. Let our experience in Monterey, Santa Cruz, San Benito, and Maricopa Counties ensure your project is a seamless success.